AWS Cognito-Authentication in Web or Mobile App.
- Cloud
- Mobile
- Performance and Security
AWS Cognito-Authentication in Web or Mobile App.
Access control is one of the major aspect during any application designing whether it is react/native/react-native or web application. We use different frameworks for this purpose one of them is AWS cognito. AWS cognito is a service provided by amazon for authentication, authorisation, and user management for your web and mobile apps. Users can sign in directly with a user name and password, or through a third party such as Facebook, Amazon, Google or Apple.
The two main components of Amazon Cognito are user pools and identity pools.
UserPools– User pool is a user directories that provide sign-up and sign-in options for your app users. The user pool manages the handling of tokens that are returned from social sign-in through Facebook, Google.
IdentityPools – With an identity pool, your users can obtain temporary AWS credentials to access AWS services, such as Amazon S3 and DynamoDB. Identity pools support anonymous guest users.
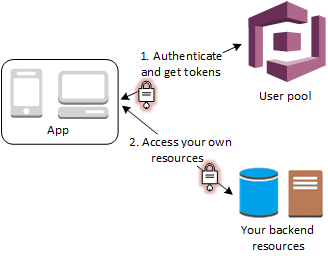
HOW IT WORKS?
App first authenticates user from a user pool by signing in directly through a user pool. After a successful authentication, your web or mobile app will receive user pool tokens from Amazon Cognito. These tokens will then be used to retrieve AWS credentials that allow your react native app to access other AWS services, or you might choose to use them to control access to your server-side resources like login signup , etc. The token gets generated automatically from cognito and the user can verify it with back-end where back-end uses AWS Cognito Library to verify the token.
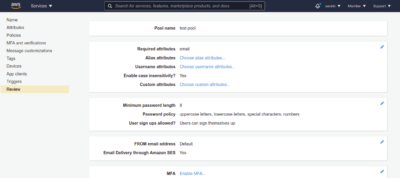
Steps to create user pool
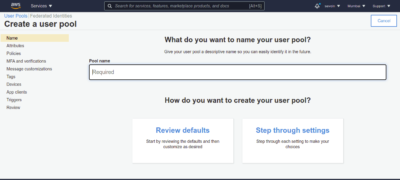
Go to the Amazon Cognito console. You might be prompted for your AWS credentials.
Choose Manage User Pools.
- Choose an existing user pool from the list, or create a user pool.
- Provide a name for the user pool and then start with setting it up.
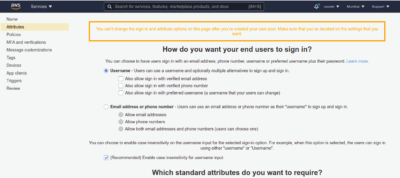
- Now we will be asked to provide information about how user will signin we can use username or email or phone number as option.
- We can also add some additional attributes like phone number, etc.
- Now we will be asked to provide the minimum length of password along with special characters and other features if required.

- Also we will have to set the expiration time of temporary passwords in days.
- We can use cognito to send sms for verification hence setting it up in dashboard we can also send custom message by setting it in the dashboard.
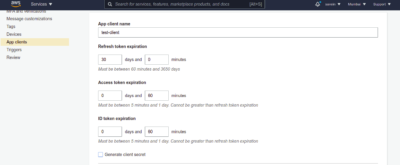
- On the navigation bar on the left-side of the page, choose App clients under General settings.
- Choose Add an app client and set refresh token expiration duration in days.
- Give your react native app a name.
- Clear the option Generate client secret for the purposes of this getting started exercise, as it would not be secure to send it on the URL using client-side JavaScript. The client secret is used by react native applications that have a server-side component that can secure the client secret.
- Choose Create app client.
- Note the App client ID.
- Choose Return to pool details.
- Choose App client settings from the navigation bar on the left-side of the console page.
- Select Cognito User Pool as one of the Enabled Identity Providers.
- Enter a callback URL for the Amazon Cognito authorisation server to call after users are authenticated. For a web app, the URL should start with
https://, such as https://www.example.com. After setting up an app client, you can configure the address of your sign-up and sign-in webpages. You can use an Amazon Cognito hosted domain and choose an available domain prefix, or you can use your own web address as a custom domain. - On the Domain name page, type a domain prefix that’s available.
- Make a note of the complete domain address.
- Choose Save changes.
Once you configure a domain for your user pool, the Amazon Cognito service automatically provisions a hosted web UI that allows you to add sign-up and sign-in pages to your react native app.
To view your sign-in page
https://your_domain/login?response_type=code&client_id=your_app_client_id&redirect_uri=your_callback_url
Now that we have set our user pool we will now start implementing it in our react native application.
We will be creating a simple signup functionality for our users.
We can use amazon-cognito-identity-js or aws-amplify for your react native app side authorisation.
LET’S TAKE SOME EXAMPLES–
Example-1
First we will do it using amazon-cognito-identity-js
For this we will create a new React Native application and then we will install amazon-cognito-identity-js
by running command npm install amazon-cognito-identity-js
We will do this so that the react/ react native application will get able to interact with cognito.
Now we will have to create a pool data object which will contain Userpool id and clientid as below-
|
1 2 3 4 |
const userPoolData={ UserPoolId: “us-east-1_XYZ”, clientId: “XYZ” } |
Now we will create an object of CognitoUserPool and will pass pool data in it and assign it in a variable.
const userPool= new CognitoUserPool(poolData);
Now, Coming on to UI part-
Now we will create a simple signup form with email and password fields and a submit button
we will fetch the email address and password as entered by user and on clicking submit we will use
the function provided by cognito so as to signup a new user-
|
1 2 3 4 5 |
userPool.signup(email,password).then(res=>{ // response successful }).catch(err=>{ //some error occured }); |
After a successful response we will get an email verification link with a verify link.
On clicking it the user registration will get confirmed in cognito.
Example-2
Doing authentication using Aws-amplify
For this in App.js file of our react native app or the entry file we will configure AWS first by providing certain params like userPoolId,project region, cognito region, aws userpools webclient id.
So first of all we will run command npm install aws-amplify –save.
After running this command we will import amplify in our App.js and will configure amplify in our project.
|
1 2 3 4 5 6 7 8 |
import { Amplify } from 'aws-amplify'; Amplify.configure({ Auth:{ region:’abcd’, userPoolId:’user_pool_id’, userPoolWebClinetId:’user_pool_web_client_id; } }); |
After configuring we will navigate to our screen where we have designed the form and will import amplify in it.
|
1 |
import { Auth } from 'aws-amplify'; |
After importing it we will have to signup the user using
|
1 2 3 4 5 6 7 8 9 10 11 12 13 14 15 16 |
Auth.signUp({ email: email, password: password, //Attributes are optional attributes:{ name:’name_user’, phone:’phone_number’ } }) .then(response => { //successful response }).catch(er => { //error response }); |
Same as before, after a successful response we will get an email verification link with a verify link. On clicking it the user registration will get confirmed in cognito.