Deployment of Strapi and Next.js application
- General
Deployment of Strapi and Next.js application
# Deploying Strapi application on Heroku
Strapi is a leading open-source Headless CMS. You can know more about Strapi here in my previous blog . This article is focused on the Deployment of Strapi CMS. You can choose any of your favourite servers like AWS, Azure, etc. I chose Heroku as it is super quick and we can easily deploy our apps here. I was able to deploy my CMS on Heroku within a few minutes. I love the CLI through which I can just push my changes and it gets deployed automatically. You can find more about Heroku here.
Requirements
For deploying our Strapi application on Heroku, we will need to have the following in place:
- Github/Bitbucket account
- Heroku account
- Git installed on your machine
- Node.js v14+
- Code Editor(VS Code recommended)
NOTE: I’m assuming that you already know how to create Strapi application. If you don’t, then you can see this post.
STEPS:
1. Heroku CLI Installation
Download and install the Heroku CLI for your operating system:
|
1 |
sudo snap install --classic heroku |
Mac: Download the installer
Windows: Download the appropriate installer for your Windows installation:
64-bit installer
32-bit installer
2. Login to Heroku from your CLI
Enter this command in your terminal:
|
1 |
heroku login |
3. Create a new project (or use existing one)
Create a new Strapi project (if you want to deploy an existing project go to step 4).
|
1 |
npx create-strapi-app@latest my-project --quickstart |
|
1 |
yarn create strapi-app my-project --quickstart |
4. Update .gitignore
Add the package-lock.json at the end of .gitignore:
Path: ./project-name/.gitignore
5. Init a git repository and commit your project
Path: ./project-name/
|
1 2 3 4 |
cd project-name git init git add. git commit -m "Initial commit" |
6. Create Heroku project
Create a new Heroku project.
Path: ./project-name
|
1 |
heroku create custom-project-name |
If we do not provide the custom project name then, Heroku will automatically generate a random project name.
7. Heroku Database setup
You can follow these steps to deploy your Strapi app to Heroku using PostgreSQL
# Install the Heroku Postgres addon for using Postgres
Heroku provides a powerful addon “Heroku Postgres addon” system which we will be using in this section. This addon will provide a free “Hobby Dev” plan.
|
1 |
heroku addons:create heroku-postgresql:hobby-dev |
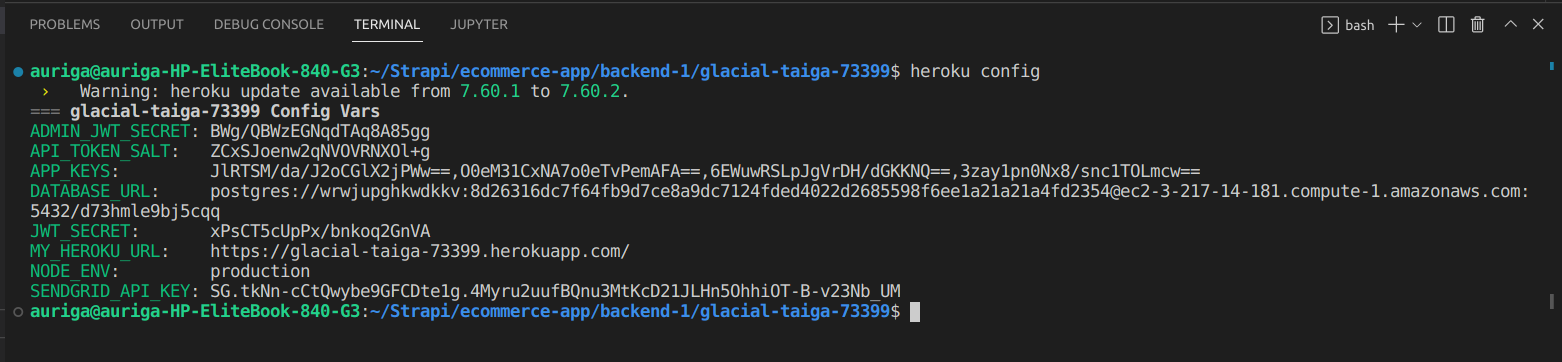
# Retrieve database credentials
To retrieve database credentials, run the following command in your terminal:
|
1 |
heroku config |
It should print something like this:
# Set Database variables automatically
Strapi requires a variable (host, username, etc.) for database connection configuration. So, from the DATABASE_URL above, Strapi will deconstruct that environment variable using pg-connection-string (opens new window)package. Heroku will sometimes change the above URL, so it’s best to automate the deconstruction of it, as Heroku will automatically update the DATABASE_URL environment variable.
Install the package:
|
1 |
npm install pg-connection-string --save |
# Create your Heroku database config file for production
Create new subfolders /env/production in ./config directory:, then create a new database.js in this folder. Your path should look like this: ./config/env/production/database.js.
When you run locally you should be using the ./config/database.js which could be set to use SQLite, however, it’s recommended you use PostgreSQL locally also, for information on configuring your local database, please see the database documentation
|
1 2 3 4 5 6 7 8 9 10 11 12 13 14 15 16 17 18 19 20 21 |
// path: ./config/env/production/database.js const parse = require('pg-connection-string').parse; const config = parse(process.env.DATABASE_URL); module.exports = ({ env }) => ({ connection: { client: 'postgres', connection: { host: config.host, port: config.port, database: config.database, user: config.user, password: config.password, ssl: { rejectUnauthorized: false }, }, debug: false, }, }); |
You also need to set the NODE_ENV variable on Heroku to production to ensure this new database configuration file is used.
|
1 |
heroku config:set NODE_ENV=production |
# Create your Strapi server config for production
Create a new server.js in a new env folder. In this file, you only need keys, UR
L and app, to notify Strapi what our public Heroku domain is. All other settings will automatically be pulled from the default ./config/server.js.
|
1 2 3 4 5 6 7 8 9 |
//path: ./config/env/production/server.js module.exports = ({ env }) => ({ proxy: true, url: env('MY_HEROKU_URL'), app: { keys: env.array('APP_KEYS') }, }) |
You will also need to set the environment variable in Heroku for the MY_HEROKU_URL. This will populate the variable with something like https://your-app.heroku.com.
|
1 2 3 4 5 |
heroku config:set MY_HEROKU_URL=$(heroku info -s | grep web_url | cut -d= -f2) heroku config:set APP_KEYS=$(cat .env | grep APP_KEYS | cut -d= -f2-) heroku config:set API_TOKEN_SALT=$(cat .env | grep API_TOKEN_SALT | cut -d= -f2) heroku config:set ADMIN_JWT_SECRET=$(cat .env | grep ADMIN_JWT_SECRET | cut -d= -f2) heroku config:set JWT_SECRET=$(cat .env | grep -w JWT_SECRET | cut -d= -f2) |
# Install the pg node module
Unless you originally installed Strapi with PostgreSQL, you need to install the pg (opens new window)node module.
path: ./project-name
|
1 |
npm install pg --save |
# Commit your changes
|
1 2 |
git add . git commit -m "Update database config" |
# Deploy
|
1 |
git push heroku:HEAD main |
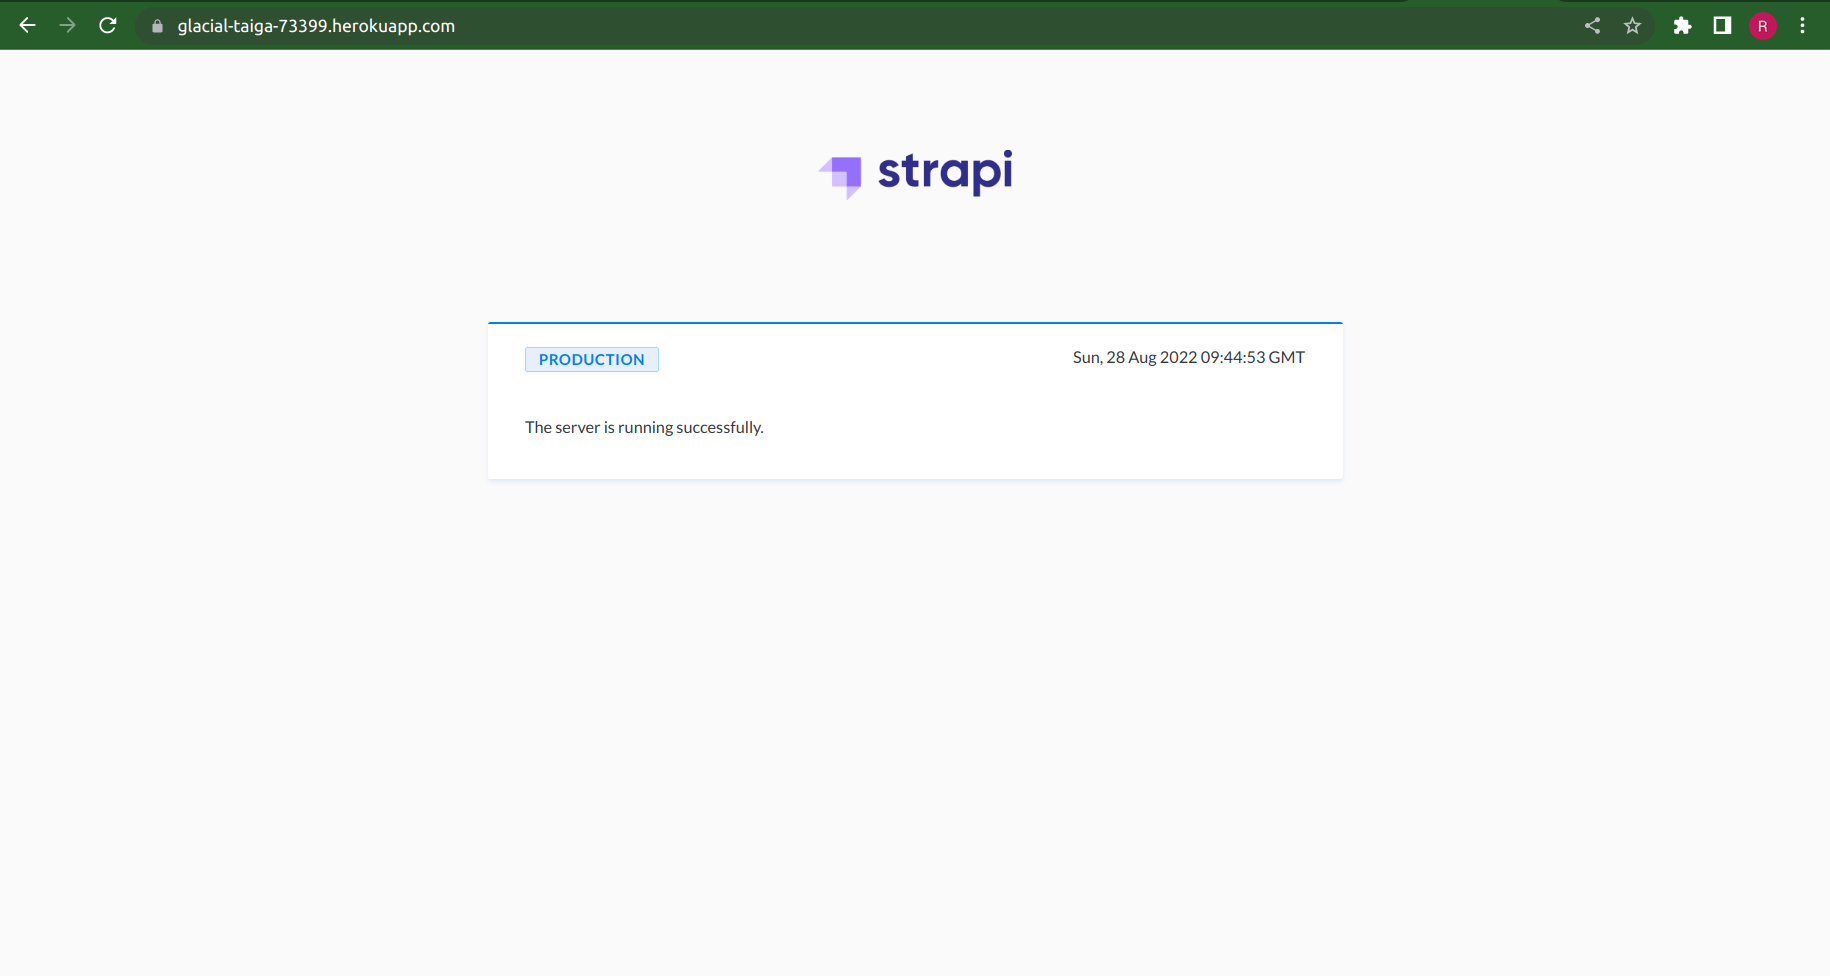
The deployment may take a few minutes. In the end, logs will display the URL of your project (e.g. https://glacial-taiga-73399.herokuapp.com). You can also open your project using the command line:
|
1 |
heroku open |
If you see the Strapi Welcome page, you have correctly set up, configured, and deployed your Strapi project on Heroku. You will now need to set up your admin user as the production database is brand-new (and empty).
# Project updates
As you continue developing your application with Strapi, you may want to use version control (opens new window), or you can continue to use git push heroku HEAD:mainto commit and push changes to Heroku directly.
|
1 2 3 4 |
git add . git commit -am "Changes to my-project noted" git push heroku HEAD:main heroku open |
Deploying Next.js Application
Next. js can be deployed to any hosting provider that supports Node. js. For example, AWS EC2 or a DigitalOcean Droplet.
Why not Surge?
Because any attempt to deploy Next.js will result in failure. Next by its nature won’t produce a static site and will not play with Surge. Next.js supports “getServerSideProps” or “getInitialProps” which render the page on-demand,per-request.
Next.js and Vercel
Vercel is made by the creators of Next.js and has first-class support for Next.js. When you deploy your Next.js app to Vercel, the following happens by default:
- Pages that use Static Generation and assets (JS, CSS, images, fonts, etc) will automatically be served from the Vercel Edge Network, which is blazingly fast.
- Pages that use Server-Side Rendering and API routes will automatically become isolated Serverless Functions. This allows page rendering and API requests to scale infinitely.
Vercel has many more features, such as:
- Custom Domains: Once deployed on Vercel, you can assign a custom domain to your Next.js app.
- Environment Variables: You can also set environment variables on Vercel.
- Automatic HTTPS: HTTPS is enabled by default (including custom domains) and doesn’t require extra configuration.
The easiest way to deploy Next.js to production is to use the Vercel platform developed by the creators of Next.js.
1. Push Next.js app to GitHub/BitBucket
Before we deploy, let’s push our Next.js app to GitHub/BitBucket if you haven’t done so already. This will make deployment easier.
- Create a repository called “your-repo-name”.
- Initialize git repository locally for your Next.js app.
- Push your Next.js app to your repository.
In my case, I have used bitbucket and my repository name is “nextjs”:
|
1 2 |
git remote add origin https://Rahul1676@bitbucket.org/Rahul1676/nextjs.git git push -u origin main |
2. Create a Vercel account
First, go to https://vercel.com/signup to create a Vercel account. Choose to Continue with GitHub/Continue with Bitbucket and go through the signup process.
3. Import your repository
Once you have signed up, Import your repository.
You can use default values for the following settings i.e, no need to change anything. Vercel automatically detects that you have a Next.js app and chooses optimal build settings for you.
- Project Name
- Root Directory
- Build Command
- Output Directory
- Development Command
When you deploy, your Next.js app will start building. It should finish in under a minute. When it’s done, you’ll get deployment URLs. Click on one of the URLs and see the Next.js starter page live.
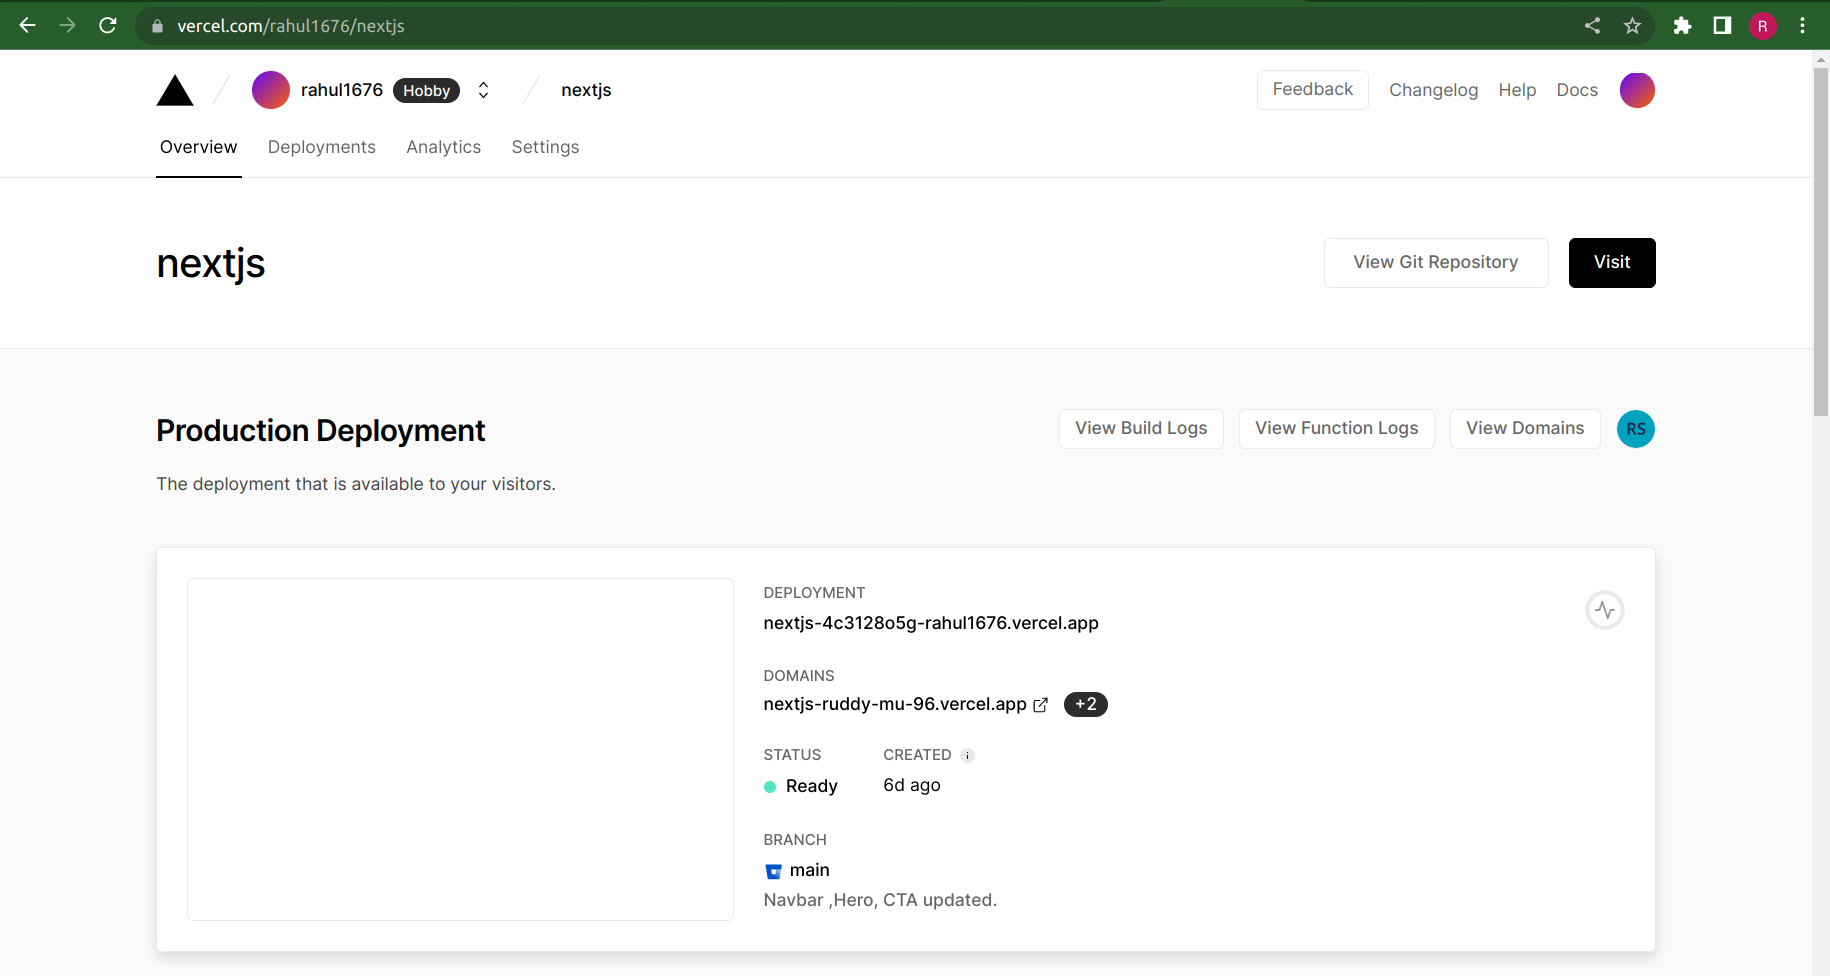
So by using the above steps we can successfully deploy our Next.js application on Vercel.
Conclusion
Congratulations, you have seen it to the end of this guide. You have seen how to deploy Strapi on Heroku and Next.js on Vercel. If you have any doubts or queries regarding this then you can also follow the links that I provided below in References.