How to install and configure Puppet with Master/Slave configuration in Ubuntu/Debian
- General
How to install and configure Puppet with Master/Slave configuration in Ubuntu/Debian
What is Puppet?
Puppet is an open-source, software configuration management tool. It helps in keeping configurations automated and consistent with what we require and what is on production or in our developer environment. It can run on various types of operating systems like Unix based systems, Microsoft Windows and Mac-os. It does not use any programming language, it has its own declarative language to set configuration settings. Puppet has a big community and a very large user base so if anyone is seeking help or support in Puppet, they will definitely get it.
Working Of Puppet:
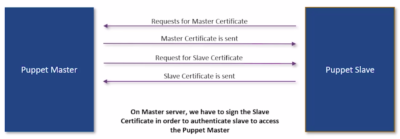
Puppet follows a master-slave pull-based architecture, Where multiple slaves/agents serve a master or we can say a master node controls multiple slaves as follows in the diagram:

To achieve the above scenario Puppet slave first requests for a master certificate, the master sends its certificate and request for the slave certificate. All the information which is communicated between master and slave nodes is encrypted using SSL certificates. Once certificates are transferred on both ends, we need to sign the slave certificate on the master server in order to authenticate slave as shown in the below diagram:
Puppet Installation:
Setting up the Master server:
You can run following commands to setup Puppet master on the master server:
|
1 2 3 4 5 6 7 |
$ curl -O https://apt.puppetlabs.com/puppetlabs-release-pc1-xenial.deb $ sudo dpkg -i puppetlabs-release-pc1-xenial.deb $ sudo apt-get update $ sudo apt-get install puppetserver or sudo apt-get install puppetmaster |
By default, Puppet uses 2GB of RAM and can be customized as follows:
|
1 2 3 4 5 |
$ sudo vi etc/default/puppetserver JAVA_ARGS="-Xms3g -Xmx3g -XX:MaxPermSize=256m" $ sudo syatemctl restart puppetmaster.service |
Puppet uses port 8140 to communicate, so we’ll ensure it’s open:
|
1 |
$ sudo ufw allow 8140 |
Installation can be checked by running the following commands:
|
1 2 3 |
$ apt policy puppetmaster $ sudo systemctl status puppetmaster.service |
To connect to the slave server, either slave should have DNS set up or we can set it up in the file named hosts:
|
1 2 3 |
$ vi etc/hosts 192.168.0.110(slave’s ip) puppet |
Setting up the Slave server:
You can run following commands to setup Puppet Agent on multiple slave servers:
|
1 2 3 4 5 6 7 |
$ wget https://apt.puppetlabs.com/puppetlabs-release-pc1-xenial.deb $ sudo dpkg -i puppetlabs-release-pc1-xenial.deb $ sudo apt-get update $ sudo apt-get install puppet-agent |
To connect to the master server:
|
1 2 3 |
$ sudo vi etc/hosts 192.168.0.109(master’s ip) puppet |
|
1 2 3 |
$ sudo systemctl enable puppet $ sudo systemctl start puppet |
As we started puppet on the slave, it’ll send a request to the master for the certificate and we can check and sign them on master server as following:
|
1 2 3 |
$ sudo puppet cert list $ sudo puppet cert sign --all |
Manifest File:
Now when everything is set, we’ll create a manifest file that specifies the changes have to be made on the agent/slave server. So basically manifest is a collection of resource declarations, ends with the .pp extension. Resources and their states can be described either using Puppet’s declarative language or a Ruby DSL (domain-specific language).
Syntax:
|
1 2 3 4 5 |
Resource_type:{ ‘resource_name’: Attributes => value, } |
Like scripting language variables, loops and conditional statements can be used while writing a manifest file.
Examples:
1.Creating a file on the agent server through the master server:
First, create a manifest directory and manifest file named site.pp and put the content in it as shown below:
|
1 2 3 4 5 6 7 8 9 10 11 12 13 14 15 16 17 18 19 |
$ sudo mkdir -p /etc/puppet/code/environments/production/manifest/ $ sudo nano /etc/puppet/code/environments/production/manifest/site.pp node default{ file:{ ‘tmp/test_file.txt’: # resource_type file and filename ensure => ‘present’, # make sure it exists mode => ‘0755’, # file permissions content => ‘File is successfully created on the agent server’ } } $ sudo systemctl restart puppetmaster.service |
Note: replace the default with IP if you want to make changes on a specific IP/node, otherwise it’ll go for every slave request for the changes.
Now go to the agent and because the Puppet is a pull configuration tool so the agent has to request for the changes, now run the below command on the agent to test the above code working:
|
1 |
$ sudo puppet agent --test |
And that’s it, you can see the file inside your tmp directory having the same permissions and content we provided through the master’s manifest.
2.installing Nginx on agent server:
|
1 2 3 4 5 6 7 8 9 10 11 12 13 14 15 16 17 18 19 |
$ sudo nano /etc/puppet/code/environments/production/manifest/site.pp node default{ package:{ ‘nginx’: # resource_type package and name ensure => ‘installed’, # make sure it exists } file:{‘tmp/status.txt’: ensure => ‘exists’, content => ‘nginx installed successfully’ } $ sudo systemctl restart puppetmaster.service |
Now go to the agent server and run the below command to test the above code working:
|
1 |
$ sudo puppet agent --test |
By default, Puppet does polling every 30 mins but we can change it according to our requirement in /etc/puppet/puppet.conf file by changing the runinterval property.