Introduction of caching and Redis Cache in Spring boot
- General
Introduction of caching and Redis Cache in Spring boot
Today, we are going to look at a basic overview of Caching, Its types, and its implementation in a spring boot application.
Basically, In essence, caching is known as “Storing the frequently used DB data into memory.“.
The following categories apply to caches:
- Embedded Cache: In this cache, we take a copy of the data from DB and put it in the application, and use it for reference mappings or private information.
- Client-Server Cache: It follows Client-Server Architecture. This cache is present between the Application and the Database. It serves as a distinct instance that we may connect to from our apps.
- Distributed Cache: It is used mostly in systems built on microservices when you want low latency and high volume transactions to be processed and retrieved utilizing a cache.
What is Redis?
- Redis is known as the Remote Dictionary Server. It is used as an in-memory database, Cache, and message broker.
- It is a fully-fledged primary DB, which can be used for persistent multiple data formats.
For learning more about Redis, you can check the Redis official docs here.
Let’s start with Project and Redis Installation.
For Installing the Redis server on your Computer, you need to follow this article. After Installing the Redis server on your computer, you can access it through the command line of your computer using the command: redis-cli.
Let’s take a random repo from GitHub. You can also take this one. Download It and Open this spring boot project in any Editor. For connecting with the Redis server, we have used the below dependency.
|
1 2 3 4 |
<dependency> <groupId>org.springframework.boot</groupId> <artifactId>spring-boot-starter-data-redis</artifactId> </dependency> |
We have used PostgreSQL In the project, so you need to install PostgreSQL on your machine. You can find any suitable tutorial for installing it.
Note: I have inserted 2lakhs dummy user data in my user’s table. You can also find dummy data on the internet or you can take the data from here, import it into the user’s table, and insert that into the table so the performance of API can be checked.
How to enable caching in the project?
- Firstly, you need to define @EnableCaching in the SpringBootRedisExampleApplication.java file.
- Now, you need to define the below properties in the application.properties file.
|
1 2 3 4 5 |
# REDIS spring.redis.host=127.0.0.1 spring.redis.port=6379 spring.cache.redis.cache-null-values=false spring.cache.redis.time-to-live=600000 |
Look At the below function present in /dao/UserDaoImpl.java
|
1 2 3 4 5 6 7 8 9 |
@Override @Caching(evict = { @CacheEvict(value = "usersList", allEntries = true), },put = {@CachePut(value = "user", key = "#user.getUserId()") }) public User saveUser(User user) { try { return userRepo.save(user); } catch (Exception e) { throw new CustomException("Error while saving user", 500); } } |
We have added @CachePut annotation for updating or adding the particular entity in the cache.
@CacheEvict is used because If we have created a cache for the users list then if the user is updated or deleted then we are going to evict or flush the cache.
In allUsers(/dao/UserDaoImpl.java) method, i have changed the per page items as follows:
|
1 |
Page<User> users = userRepo.findAll(PageRequest.of(--page, 100000)); |
I have passed per page entry should be 1 lakh, as i have inserted 2 lakh dummy data in the database.
|
1 |
So, total time = CacheMiss + DatabaseQuery + CacheWritten + Response Time |
That is the main disadvantage of using the Redis server. Suppose for each API call we are requesting a new page, then every time the above steps will occur, and instead of reducing API time, it will increase API response time.
Let’s see the API result the very first time.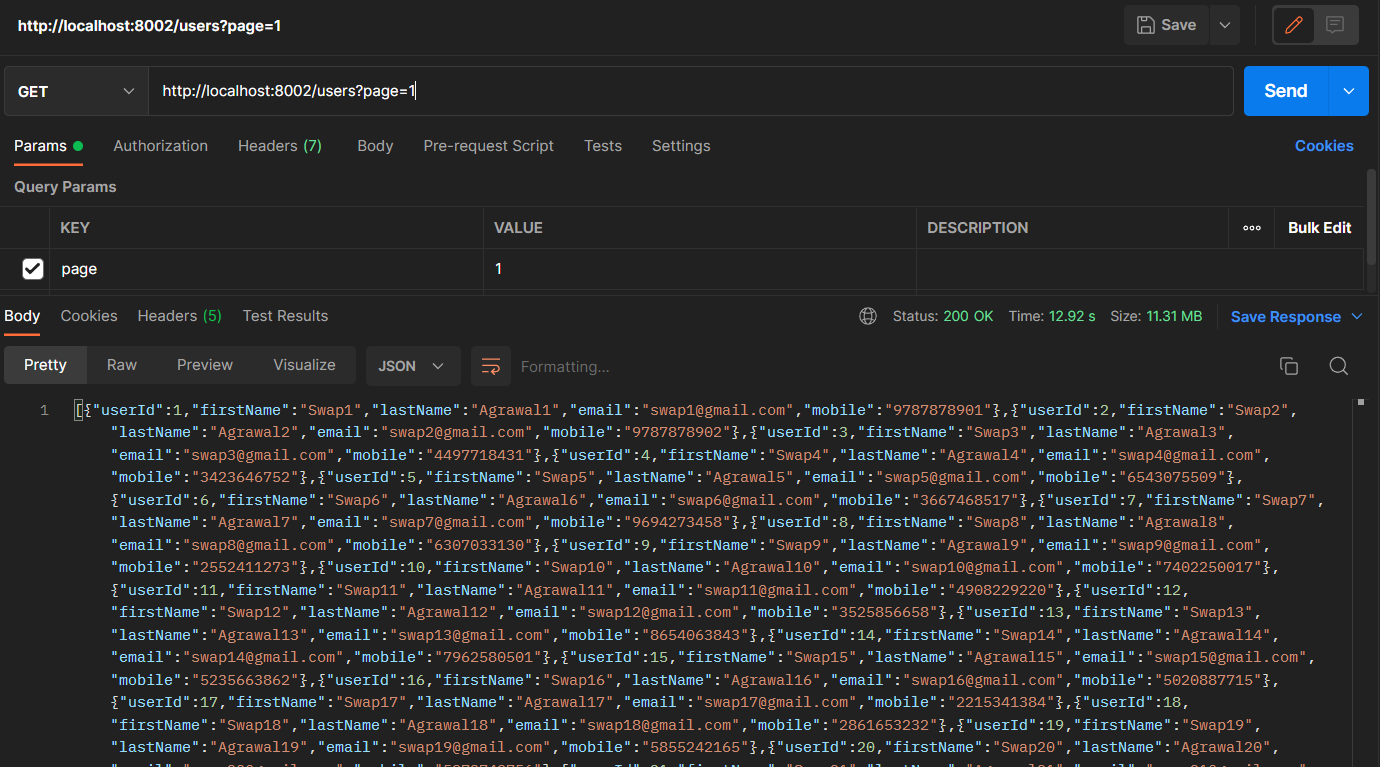
So, the API took almost 13 seconds to respond.
Now, Call the same API again, as data is present in the cache itself.
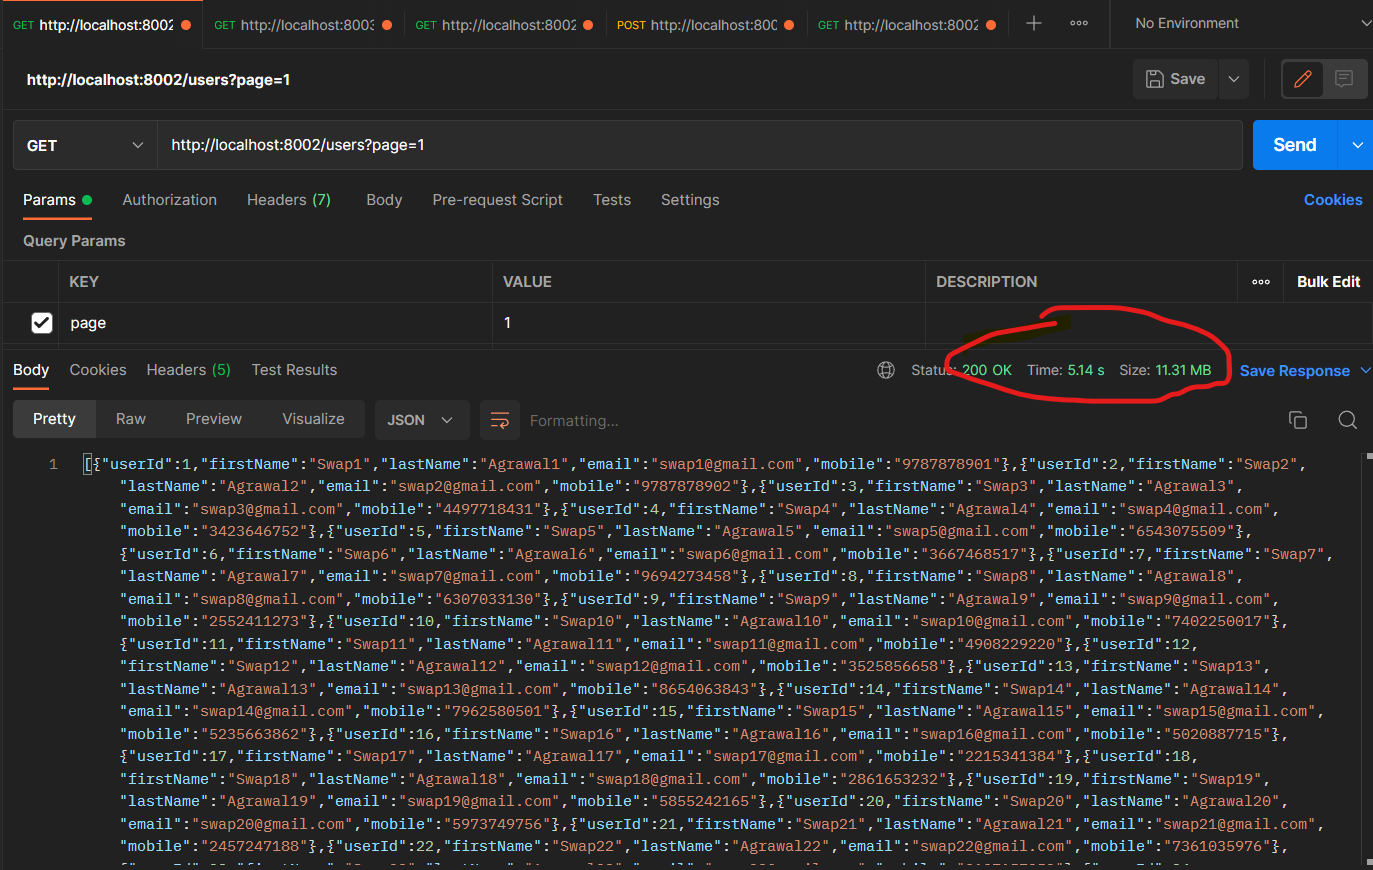
Now, the API took 5 seconds to fetch the data. This is the main advantage of Using Cache. It reduced the time of fetching data.
Now, Let’s look at the API time when we are not using cache as a middle layer.
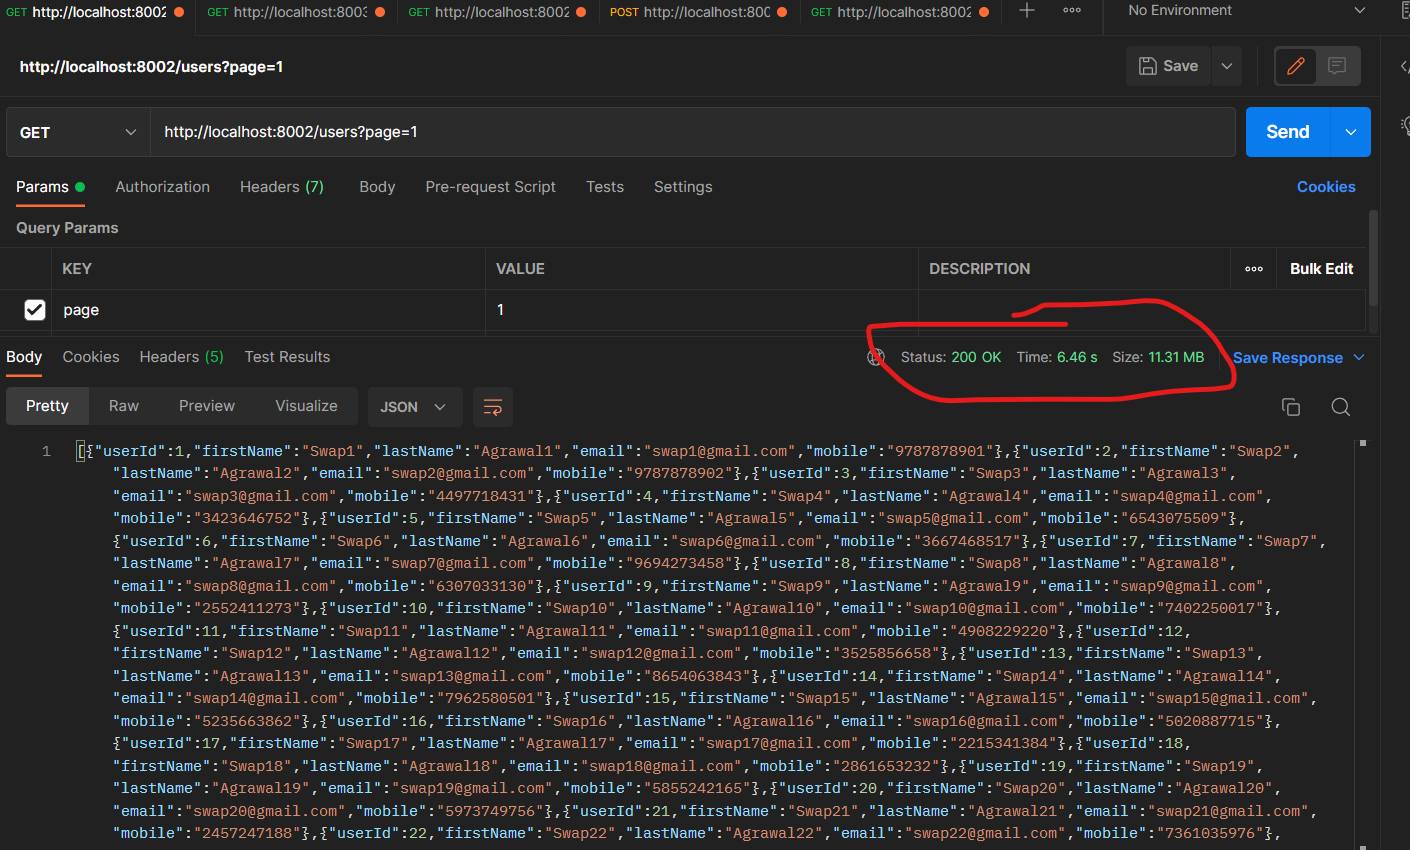
This time, API took almost 7 seconds, as it is not writing data to the cache layer.
Thus, you can play around with the above cache by creating various other complex APIs.
Resources
You can get more learning on the official page of Redis itself.
For an understanding of caching, you can check here.
Thanks.