RabbitMQ, Implementation of RabbitMQ in YII.
- General
RabbitMQ, Implementation of RabbitMQ in YII.
What is RabbitMQ?
RabbitMQ is open source software used to manage the queue. We can queue our application tasks to execute them in async way by using RabbitMQ. In simple word it is a software where queue can be defined then message can be passed on these queue and different applications may connect to queue to process those message. Message can have any kind of data, it could be a simple text message or any action driven data.
Why we need RabbitMQ in our Project?
In our recent project we need to do many tasks on a event completion. Firstly we were doing it in sync way, it was taking 8-10 seconds. Due to that user have to wait till all these tasks complete. So to improve user experience we need to functionality where we can do all these tasks in async manner. So we studied many blogs and post and we came to know about pthreading and event-observer pattern. But these were not fulfilling our requirement because p threading is not good for web server environment and event observer was not making it async in a best manner. So finally we studied about queue and find RabbitMQ better for our requirements.
Architecture of RabbitMQ
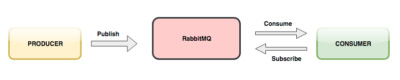
The bais architecture of rabbitMQ is simple, client applications that create and publish/deliver message to queue are called producers (message queue). Other applications that connects to the queue and subscribes to the messages and process called consumers. So RabbitMQ works on a producer consumer paradigm. Messages delivered onto the queue are stored until the consumer retrieves them and acknowledge queue.
Install RabbitMQ
-
To start, stop, restart and check the application status, use the following:12$ sudo apt-get update$ sudo apt-get install rabbitmq-serverImplementation in Project1234567891011To start the service:$ rabbitmq-server startTo stop the service:$ rabbitmq-server stopTo restart the service:$ rabbitmq-server restartTo check the status:$ rabbitmq-server status
Here we will discuss how we can implement RabbitMQ in YII.
Step 1 : Add this line in your composer.json and run composer update.
1"devmustafa/yii2-amqp": "dev-master",Step 2 : Now we need to configure it. For this add following configuration setting in common/config/main-local.php
12345678'amqp' => ['class' => 'devmustafa\amqp\components\Amqp','host' => '127.0.0.1','port' => 5672,'user' => 'guest','password' => 'guest','vhost' => '/',],Step 3 : How to create and deliver message on queue
- Add these line on top of your file to include
12use devmustafa\amqp\PhpAmqpLib\Connection\AMQPConnection;use devmustafa\amqp\PhpAmqpLib\Channel\AMQPChannel;- Use following code in your function to deliver message on queue
1234567891011$exchange = 'exchange_name';$queue = 'queue_name';$routingKey = 'key_name';$message = json_encode($dataArray);Yii::$app->amqp->declareExchange($exchange, $type = 'topic', $passive = false, $durable = true, $auto_delete = false);Yii::$app->amqp->declareQueue($queue, $passive = false, $durable = true, $exclusive = false, $auto_delete = false);Yii::$app->amqp->bindQueueExchanger($queue, $exchange, $routingKey);Yii::$app->amqp->publish_message($message, $exchange, $routingKey,$content_type = 'application/json', $app_id = Yii::$app->name);Step 4: Subscribe to queue and retrieves message.
12345678910111213141516171819202122232425$exchange = 'exchange_name';$queue = 'queue_name';$routingKey = 'key_name';$consumer_tag = '';$conn = new AMQPConnection(HOST, 5672, USER, PASSWORD, '/');$ch = $conn->channel();$ch->exchange_declare($exchange, 'topic', false, true, false);$ch->queue_declare($queue, false, false, true, false);$ch->queue_bind($queue, $exchange, $routingKey);ch->basic_consume($queue, $consumer_tag, false, true, false, false, [$this, 'process_message']);register_shutdown_function([$this, 'shutdown'], $ch, $conn);// Loop as long as the channel has callbacks registeredwhile (count($ch->callbacks)) {$ch->wait();}public function process_message($msg){$data = json_decode($msg->body,true);//TODO - to process the message}Enable RabbitMQ Management Console
1$ sudo rabbitmq-plugins enable rabbitmq_managementOnce you’ve enabled the console, it can be accessed using your favourite web browser by visiting: http://127.0.0.1:15672/
Other Useful Commands
You can check what RabbitMQ queues has and how many messages are in them. You can check it using the rabbitmqctl tool:
1$ sudo rabbitmqctl list_queuesThanks for reading.
In our next chapter we will discuss in details about Exchanges, Queues, Binding and Routing Key and how we can make our exchange/queue persistent.