React Testing Library
- General
React Testing Library
Why is testing required?
Testing is beneficial for the following reasons:-
- Easy detection of errors in code or its flow.
- Enhance the quality of the product while reducing costs, maximising ROI, and saving development time
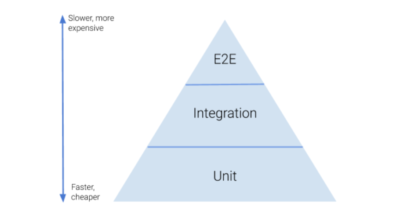
Types of Testing
Testing is of many types. Below are the most common types of testing:
- Unit testing: It is a software development process in which the smallest testable parts of an application, called units, are individually and independently scrutinised for proper operation.
- Integration testing: It is defined as a type of testing where software modules are integrated logically and tested as a group.
- E2E testing: E2E tests simulate the real-world behaviour of users i.e. we are testing the application from start to end.
Test Block Flow in a React Testing Library test file
- Render the component: We use the render method from RTL to make the component available for testing. The component should be wrapped inside the additional wrappers we have used in this case BrowserRouter and ThemeProvider.
12345678const MockSocialLogin = () => (<ThemeProvider theme={theme}><BrowserRouter><Login /></BrowserRouter></ThemeProvider>);render(<MockSocialLogin />);
2. Find elements to interact with:
- In order to interact with elements, RTL provides various queries for finding elements like getByText(), getByRole() and getByLabelText() etc.
- If these methods are not enough for getting the element we can use the getByTestId() method which allows us to get the element by the data-testid attribute. But it is not recommended because it does not resemble the actual user interaction with the application.
- The priority for using these interaction methods is mentioned in the official documentation. You can read it here. In this getByText(), getByRole() are more preferred as compared to getByTestId().
|
1 |
const Button = screen.getByText(LABEL_EMAIL_LOGIN); |
- In RTL user-event library provides methods to interact with the application in the browser.
- Example:- userEvent.click(), type(), hover(), paste().
- These methods simulate user interaction like button click event and text field input type event etc.
|
1 |
userEvent.click(emailLoginButton); |
- RTL also provides fireEvent for the same functionality but we prefer userEvent more as it dispatches the events like they would happen if a user interacted with the Application. Read the comparison for userEvent vs fireEvent here.
4. Assert the result:
- To assert or to know if our test case was successful we use expect.
|
1 |
expect(Button).toBeInTheDocument(); |
Mocking
- The component we want to test may have many dependencies like libraries, custom hooks, functions etc.
- RTL allows us to mock these functions thereby replacing the actual implementation of a function in our testing files.
- Hence, mocking helps prevent API calls. (API calls should be mocked in testing files as they cost time and money.)
- To know more about mocking in RTL read here.
Mocking a function
- In RTL we use jest.mock() function for mocking a function. With jest.mock() we replace the actual implementation and return value with the mocked value.
|
1 2 3 |
jest.mock("./fetchPosts", () => ({ fetchPosts: jest.fn().mockResolvedValue([]), })); |
- A mock function has three major features:
- Capturing calls
- Set return values
- Change the implementation.
- In jest the simplest way to create a mock function instance with jest.fn().
|
1 |
const mockedUsedNavigate = jest.fn(); |
Mocking a module
Mocking a Named export
- In RTL, for mocking a named export module we use the jest.mock() function.
- Also, we can change its return function value as per the requirement.
- requireActual() function returns all the original implementation of functions and their variables even if we mocked it.
- In the example below, we only mocked the isLoggedIn() function of the AuthContext file rest of the content is not mocked.
|
1 2 3 4 5 6 7 |
const mockedseAuthContext = { isLoggedIn: () => true, }; jest.mock("contexts/AuthContext", () => ({ ...(jest.requireActual("contexts/AuthContext") as any), useAuthContext: () => mockedseAuthContext, })); |
Mocking a default export
- For mocking a default export module we have to modify our jest.mock() function slightly with property __esModule enabled.
- __esModule is a flag which is used by a typescript compiler while checking for default exports.
|
1 2 3 4 5 6 7 8 |
jest.mock("containers/auth/Login/useLogin", () => { const originalModule = jest.requireActual("containers/auth/Login/useLogin"); return { __esModule: true, ...originalModule, error: "error", }; }); |
Routing in testing
- Routing during testing cannot take place like it usually would in the application flow.
- We need to add the exact URL and pass the params.
- We can either use history.push() or memoryRouter() in react-router-dom-v6.
|
1 2 3 4 5 6 7 8 9 10 11 12 13 14 15 16 17 18 19 |
<MemoryRouter initialEntries={[ { hash: "", key: "key", pathname: "/signup", search: "?isInvited=true", state: null, }, ROUTE_LOGIN, ]} initialIndex={0} > <> <Signup /> <Login /> <Dashboard /> </> </MemoryRouter>; |
- The initialEntries is an array used to populate the history stack with a list of locations. A location path could be a string or even an object of shape { pathname, search, hash, state }
- The initialIndex is the initial location’s index in the array of initialEntries.
- Enclosed between the MemoryRouter tag are all the components for which we have included the routes.
- To read more about routing in the testing file refer to the link here.
Additional Points
- beforeEach(), afterEach(), afterAll(), and beforeAll() methods are used for repeating setup or any other code block before and after running test cases like the render function before each test case and the cleanup function after each testing file. All of them have block scope. Read more about them here.
|
1 |
beforeEach(() => render(<MockSignup />)); |
|
1 2 3 4 5 |
afterAll(() => { jest.clearAllMocks(); }); |
- describe() block is used to group the test cases together. This helps enhance the readability of the testing logs in the console.
- it() block or the test() block can either be used to define each test case it is wrapped inside the describe() block. it() is an alias to test() block.
- The extension of the testing file should be the same as the react component to be tested. Ex: Test file for login.tsx or login.jsx will be login.test.tsx, login.test.jsx respectively.
- waitFor() function is used for waiting until the async function is completed.
|
1 2 3 |
await waitFor(() => { const msg = screen.getByText(/demo/g); }); |
Thank you for reading the blog! Hope you could get some useful insights. Have fun testing your react apps!!😃
List of Acronyms:
- RTL: React Testing Library.
- E2E testing: End-to-End testing.
- ROI: Return on investment,
List of References: