Unit Testing Using Junit 5
- General
Unit Testing Using Junit 5
What is unit testing?
Unit testing is the first step(level) of testing in SDLC. In unit testing, a single unit or component of the software is tested by developers during the development phase or coding phase, and in this developers test the correctness of a particular component.
Why unit testing?
Unit testing is very important in software development, It ensures that every individual unit is giving the expected output.
- It helps in bug fixing at the initial level.
- It reduces minimal errors that may affect the production of software.
Test Driven Development:
As a developer we should be familiar with Test-Driven-Development.
Test-driven development (TDD) is a software development process that interweaves coding, testing, and design. It is a test-first approach that aims to improve the quality of your applications. Test-driven development is defined by the following lifecycle:
- Add a test.
- Run all of your tests and observe the new test failing.
- Implement the code.
- Run all of your tests and observe the new test succeeding.
- Refactor the code.
How to perform unit testing?
Junit 5 : JUnit 5 is the next generation of JUnit. The goal is to create an up-to-date foundation for developer-side testing on the JVM. This includes focusing on Java 8 and above, as well as enabling many different styles of testing
In this article, we will talk about unit testing in a spring boot application using Junit and Mockito tools.
First of all, we will create a maven-based spring boot application using spring initializer.
We will add basic dependency like spring boot and generate the project.
To perform unit testing using JUnit 5 we have to add the below dependencies to our project’s pom file.
|
1 2 3 4 5 6 7 8 9 10 11 12 13 |
<dependency> <groupId>org.junit.jupiter</groupId> <artifactId>junit-jupiter</artifactId> <version>5.6.0</version> <scope>test</scope> </dependency> <dependency> <groupId>org.mockito</groupId> <artifactId>mockito-junit-jupiter</artifactId> <version>3.2.4</version> <scope>test</scope> </dependency> |
We want to mock our classes so that we can test them in isolated environments, and here Mockito comes in picture. It mocks the actual class.
Here junit-jupiter is responsible for complete unit testing.
Here while creating project from spring initializer spring add these dependencies by default in our project. .
Now we will define some basic tests to understand the annotations and some basic terminologies of unit testing.
|
1 2 3 4 5 6 7 8 9 10 11 12 13 14 15 16 17 18 19 20 21 22 23 24 25 26 27 28 |
@SpringBootTest public class LifecycleDemoTest { @BeforeAll static void beforeAll() { System.out.println("Connect to the database"); } @BeforeEach void beforeEach() { System.out.println("Load the schema"); } @AfterEach void afterEach() { System.out.println("Drop the schema"); } @AfterAll static void afterAll() { System.out.println("Disconnect from the database"); } @Test void testOne() { System.out.println("Test One"); } @Test void testTwo() { System.out.println("Test Two"); } } |
Output of the above test will be:
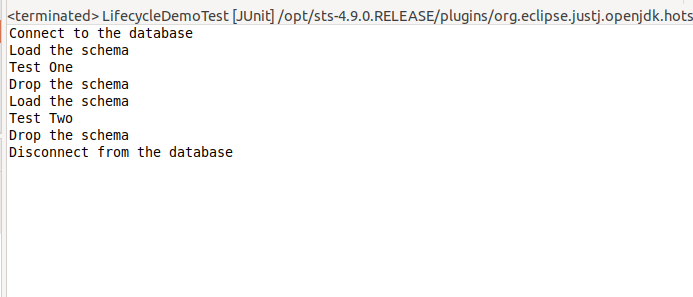
Here we used some annotations that are explained below:
- @SpringBootTest: We will define our test class with this annotation.
- @BeforeAll: This block of code will be executed on the startup of the test class.
- @BeforeEach: This block of code will be executed before every test case.
- @AfterAll: This block of code will be executed once all the test cases are executed.
- @AfterEach: This block of code will be executed after every test case.
- @Test: We use this to tell the compiler that this is our test case.
- @DisplayName: This annotation can be used with the test method to display its name in the runtime environment.
- @Mock: Use @Mock to create mocks which are needed to support testing of class to be tested.
- @InjectMock: Use InjectMocks to create class instances which needs to be tested in test class.
To test these services we will define our test methods with @Test annotation.
Note that @Test annotation comes from org.junit.jupiter.api package in JUnit 5.
In Junit 5 there are several static methods for comparing actual and expected result in Assertions class.
Below are some of the methods that we will use in this tutorial:
- assertArrayEquals: compares the contents of an actual array to an expected array.
- assertEquals: compare an actual value to an expected value.
- assertNotEquals: compares two values to validate that they are not equal.
- assertTrue: validates that the provided value is true.
- assertFalse: validates that the provided value is false.
- assertLinesMatch: compares two lists of Strings.
- assertNull: validates that the provided value is null.
- assertNotNull: validates that the provided value is not null.
- assertSame: validates that two values reference the same object.
- assertNotSame: validates that two values do not reference the same object.
- assertThrows: validates that the execution of a method throws an expected exception.
- assertTimeout: validates that a supplied function completes within a specified timeout.
- assertTimeoutPreemptively: validates that a supplied function completes within a specified timeout, but once the timeout is reached it kills the function’s execution.
- verify: Verifies certain behavior happened once.happened once.
Let’s take an example of a calculator to understand the use of these annotations:
Controller Class:
|
1 2 3 4 5 6 7 8 9 10 11 12 13 14 15 16 17 |
@RestController public class Calculator { @Autowired CalculatorService service; @RequestMapping(name = "/calculate") public int calculate(int a, int b) { if(a==0 && b==0) { throw new NullPointerException(); } else if(a==1 && b==1) { return (a+b)*a; } return service.add(a, b)*a; } } |
Now we will define test cases for above class:
|
1 2 3 4 5 6 7 8 9 10 11 12 13 14 15 16 17 18 19 20 21 22 23 24 25 26 27 28 29 30 31 32 33 34 35 36 37 38 39 40 |
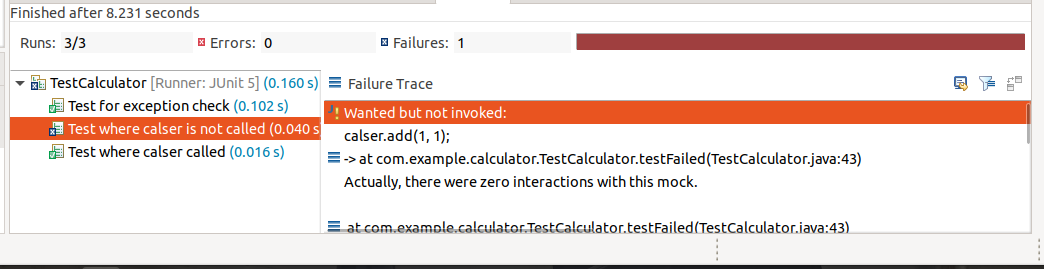
@SpringBootTest class TestCalculator { @Mock CalculatorService calser; @InjectMocks Calculator cal; @Test @DisplayName("Test where calser called") // Test will pass as calser is called here void testSuccess() { when(calser.add(3, 4)).thenReturn(7); assertEquals(21,cal.calculate(3, 4)); verify(calser).add(3, 4); } @Test @DisplayName("Test where calser is not called") // Test will failed as calser is not called here void testFailed() { when(calser.add(1, 1)).thenReturn(2); assertEquals(2,cal.calculate(1, 1)); verify(calser).add(1, 1); } @Test @DisplayName("Test for exception check") void testWithException() { try { when(calser.add(0, 0)).thenReturn(0); assertEquals(0,cal.calculate(0, 0)); } catch(NullPointerException e) { assertThat(true); } } } |
Here is the explaination of above test class:
- In this test class we are mocking the calculator service class by thinking that the service class will work correctly as expected and if we want to test the service class also then we need to implement the unit test on that method also.
- Then we inject that mock object in the class we are doing unit testing.
- Here as we can see in the controller that we are throwing an exception when both the inputs are zero so while testing we will get an exception in the result. So for that, we use try catch block.
- We are using verify directive to verify whether the request to add a method of calculator service is sent or not.
- Because initially we mocked the class with dummy data.So now if we want to access any method from the mocked class then we have to tell the mockito what to return, so for this we used when with thenReturn method which simply means when this method will be called then it have to return this value.
- We can also use doReturn with when for the same purpose.
- Here the 2nd test case failed because the calser.add method was not invoked for input 1,1 because we are not calling the calser.add method. So this test case meant to be failed.
Now we will implement unit testing on a real world example :
- Here we are using Spring in memory H2 database to save the data in the database.
- The Employee class has 3 fields named : id,name and salary.
- Here we are saving the employee details in the database and get those details from the database.
- Here we are creating unit cases for this example.
Model class of project:
|
1 2 3 4 5 6 7 8 9 10 11 12 13 |
@Entity public class Employee { @Id @GeneratedValue private int id; private String name; private long salary; //...getters and setters redacted for brevity.. } |
|
1 2 3 4 |
public class Response { private String message; private boolean status; } |
Controller Class:
|
1 2 3 4 5 6 7 8 9 10 11 12 13 14 15 16 17 18 19 20 21 |
@RestController public class EmployeeController { @Autowired private EmployeeService employeeService; @PostMapping("/addEmployee") public Response addEmployee(@RequestBody Employee employee) { return employeeService.addEmployee(employee); } @GetMapping("/getAllEmployee") public List<Employee> getAllEmployee() { return employeeService.getAllEmployee(); } @GetMapping("/getEmployee/{id}") public Employee getEmployee(@PathVariable int id) { return employeeService.getEmployee(id); } } |
Now we will define employee service to implement all the logics.
|
1 2 3 4 5 6 7 8 9 10 11 12 13 14 15 16 17 18 19 20 21 22 23 24 25 26 |
@Service public class EmployeeService { @Autowired private EmployeeDao employeeDao; public Response addEmployee(Employee employee) { employeeDao.save(employee); return new Response(employee.getId() + " inserted", Boolean.TRUE); } public List<Employee> getAllEmployee() { List<Employee> employees = employeeDao.findAll(); return employees; } public Employee getEmployee(int id) throws NullPointerException { Employee employee = employeeDao.getOne(id); if(employee != null) { return employee; } else { throw new NullPointerException(); } } } |
Now we will define our Tests:
Testing using Junit’s doReturn-when method:
|
1 2 3 4 5 6 7 8 9 10 11 12 13 14 15 16 17 18 19 20 21 22 23 24 25 26 27 28 29 30 31 32 33 34 35 36 37 38 39 40 41 42 43 44 45 46 47 48 49 50 51 52 53 54 55 |
@SpringBootTest class EmployeeServiceTest { @Mock EmployeeDao dao; @InjectMocks EmployeeService employeeService; @Test @DisplayName("Test save Employee") void testSave() { // Setup our mock repository Employee employee = new Employee(1, "employee Name", 10000l); doReturn(employee).when(dao).save(any()); // Execute the service call Response response = employeeService.addEmployee(employee); // Assert the response Assertions.assertNotNull(response); Assertions.assertEquals(Boolean.TRUE,response.isStatus()); } @Test @DisplayName("Test findAll") void testFindAll() { // Setup our mock repository Employee employee1 = new Employee(1, "Employee Name",1000l); Employee employee2 = new Employee(2, "Employee 2 Name",4000l); doReturn(Arrays.asList(employee1, employee2)).when(dao).findAll(); // Execute the service call List<Employee> employees = employeeService.getAllEmployee(); // Assert the response Assertions.assertNotNull(employees); Assertions.assertEquals(2, employees.size()); } @Test @DisplayName("Test findById Success") void testFindById() { // Setup our mock repository Employee employee = new Employee(1, "Employee Name",1000l); doReturn(employee).when(dao).getOne(Mockito.anyInt()); // Execute the service call Employee returnedEmployee = employeeService.getEmployee(1); //System.out.println(returnedEmployee.getSalary()); // Assert the response Assertions.assertSame(returnedEmployee, employee); } } |
Here we simply tested our services of saving a player to db, get details of a particular employee from db and getting all employees details. Here we used simple mockito’s methods to test these services. Following are the basic methods that we used in testing:
doReturn-when method: doReturn(employee).when(dao).save(any())
Here “employee” is the object that will be return when “save” method of dao is called. Here “dao” is the repository of entity “employee”.
@DisplayName(“Test save Employee”): It will be shown in our console as the name of the test.
We successfully tested our services now we will move forward to test our controllers.
Testing rest api endpoints using mockMvc:
|
1 2 3 4 5 6 7 8 9 10 11 12 13 14 15 16 17 18 19 20 21 22 23 24 25 26 27 28 29 30 31 32 33 34 35 36 37 38 39 40 41 42 43 44 45 46 47 48 49 50 51 52 53 54 55 56 57 58 59 60 61 62 63 64 |
@SpringBootTest @AutoConfigureMockMvc public class EmployeeControllerTest { @MockBean private EmployeeService service; @Autowired private MockMvc mockMvc; @Test @DisplayName("GET /employees success") void testGetEmployeesSuccess() throws Exception { // Setup our mocked service Employee employee1 = new Employee(1, "Employee Name", 1000l); Employee employee2 = new Employee(2, "Employee 2 Name", 4000l); doReturn(Arrays.asList(employee1, employee2)).when(service).getAllEmployee(); // Execute the GET request mockMvc.perform(get("/getAllEmployee")) // Validate the response code and content type .andExpect(status().isOk()) .andExpect(content().contentType(MediaType.APPLICATION_JSON)) // Validate the returned fields .andExpect(jsonPath("$", hasSize(2))) .andExpect(jsonPath("$[0].id", is(1))) .andExpect(jsonPath("$[0].name", is("Employee Name"))) .andExpect(jsonPath("$[0].salary", is(1000))) .andExpect(jsonPath("$[1].id", is(2))) .andExpect(jsonPath("$[1].name", is("Employee 2 Name"))) .andExpect(jsonPath("$[1].salary", is(4000))); } @Test @DisplayName("POST /rest/employee") void testCreateEmployee() throws Exception { // Setup our mocked service Employee employeeToPost = new Employee("New Employee", 1000l); Response responseToReturn = new Response("1 inserted",Boolean.TRUE); doReturn(responseToReturn).when(service).addEmployee(any()); // Execute the POST request mockMvc.perform(post("/addEmployee") .contentType(MediaType.APPLICATION_JSON) .content(asJsonString(employeeToPost))) // Validate the response code and content type .andExpect(status().isOk()) .andExpect(content().contentType(MediaType.APPLICATION_JSON)) // Validate the returned fields .andExpect(jsonPath("$.status", is(Boolean.TRUE))) .andExpect(jsonPath("$.message", is("1 inserted"))); } static String asJsonString(final Object obj) { try { return new ObjectMapper().writeValueAsString(obj); } catch (Exception e) { throw new RuntimeException(e); } } } |
@AutoConfigureMockMvc: It automatically configures mockMvc for our unit testing. If we don’t want to use this annotation we can setup mockMvc manually by following method:
|
1 2 3 4 5 6 7 |
@BeforeEach public void setUp() throws Exception { mockMvc = MockMvcBuilders.standaloneSetup(helloResource) .build(); } |
Explaination of Above Code in simple language:
- It will set up mockMvc as standAloneSetup before any test case execution.There are multiple types of setup that can be used under different conditions.
- We have to call mockMvc’s perform method to perform request like get, post ,put or delete.
- We have passed our api endpoint in get() method and we can pass our result expectation in andExpect method’s argument. Here we defined that the status of the result should be 200 ok which can be changed by the ResponseEntity object and can check for that status. If the status is not as expected then the test case will be failed.
- We can define what should be our content type of result.
- Here the “$” sign represents the resultant json object, hence here we returned two employees objects in result so we can check its size and values using keys. Here $[0] represents the first object in the json response.
- In post method testing everything is the same as the get method except that in this case we passed our content as arguments in the content() method that should be passed in the request body.
Here we completed our unit testing in different scenarios and now we are ready to implement it in a live project, So all the best guys.
You can find complete source code under this link.
If you find any difficulty in understanding code or any concept feel free to reach out in the comment section.
Thanks for all your love and support.